Friday, November 22, 2013

Craft Land's CRAZY FLASH SALE - This Week Only


Save up to 60% at the Crazy Craft Land FLASH Sale - THIS WEEK ONLY!

From Sunday 24th to Satuday 30th November, you can bag yourself a serious crafty BARGAIN at Craft Land. Save BIG on your favourite crafting materials, tools and books!

While stocks last... don't miss out! Get here fast!

Sunday, October 27, 2013

Appliqué tutorial


Hello! 

Let me first introduce myself; I'm Stephanie Deaves, sewing and quilting teacher at Craftland. I moved to Dubai, with my husband, 2 years ago after completing my degree in Textile Design at the University of the Arts, London. My degree was about taking an experimental and creative approach to textile design, bringing together ideas and conceptual development, whilst exploring the application of textiles within fashion and interior design. I now design and make my own range of accessories which I sell in and around Dubai. If you would like to know a bit more about me and my work you can visit my blog here.

I have been teaching at Craftland for a year and a half now and I love it! To be surrounded by creative minds, fabric and threads all day is a real treat ...the only downside being that I can't seem to leave without buying something (my husband doesn't share my love of rulers and scissors)!

For this blog post, I thought I'd share a couple of quilts I've made recently; my 'Monsieur Saucisson' quilt and 'Movember' quilt. They are both made using appliqué, and I have included a simple, easy to follow tutorial about appliqué in this post. Appliqué is a fantastic technique for personalising any project.

'Monsieur Saucisson'

So, anyone that knows me will know how much I love sausage dogs! The super cute sausage in this photo is called 'Dash', and sadly, no, he does not belong to me. He was the perfect model!


'Movember'

The idea behind this quilt was 'If you can't grow one, sew one!'

November is just around the corner, so get started on your 'Movember' quilt now!


Appliqué tutorial:


1. What you'll need:

  • Background fabric (something quite plain so your appliqué will be clear)
  • Fabric for appliqué (this can be patterned)
  • Fusible web (paper backed)
  • Co-ordinating thread (I usually go slightly darker than my appliqué fabric)
  • Template (you can draw your own or print a picture from the internet. Remember you will have to stitch around this, so make sure it does not have too many small details! Also, keep the image simple and quite stylised as it must be an easily recognisable outline)
  • Sewing supplies (sewing machine, scissors, pins, iron)


Template tips


2. Fusing your shape to a backing fabric:

Once you have picked your template, trace the outline onto the paper side of your fusible web (remember your image will be reversed). Then trim roughly around the outline. 

Iron the fusible web onto the wrong side of your appliqué fabric (the rough side of the fusible web is the adhesive side). Cut your shape out, peel the paper off the back, place it on your background fabric and iron it in place.


3. Stitching around your shape:

You have a few choices when it comes to selecting a stitch. You can use straight stitch for a 'messier' look as the raw edge will be visible, zig zag or blanket stitch, which gives a neater finish as the raw edges are sealed in the stitch.


I have chosen to use blanket stitch. I have chosen a slightly darker thread than the colour of my fabric so it gives the shape a bolder outline. 

When using blanket stitch, try to keep the straight line part of the stitch perfectly in line with the raw edge of your shape. When sewing curves, remember, needle down, presser foot up and slightly pivot the fabric. Only change direction when your needle is on the edge of the fabric. You can adjust the size of the stitch according to the size of your shape by changing the stitch length and width. 

Try a practice piece first! 

Secure your thread ends with either a couple of back stitches or thread your top threads into a needle, take them to the back of the fabric, tie them in a knot and trim the excess.


5. It's as easy as that! A few more and you have a quilt...


If you need any help, come along to a clinic at Craftland (you can check the schedule here). We are happy to help with any problems or questions ...or just come and show us what you're working on!

Wednesday, October 9, 2013

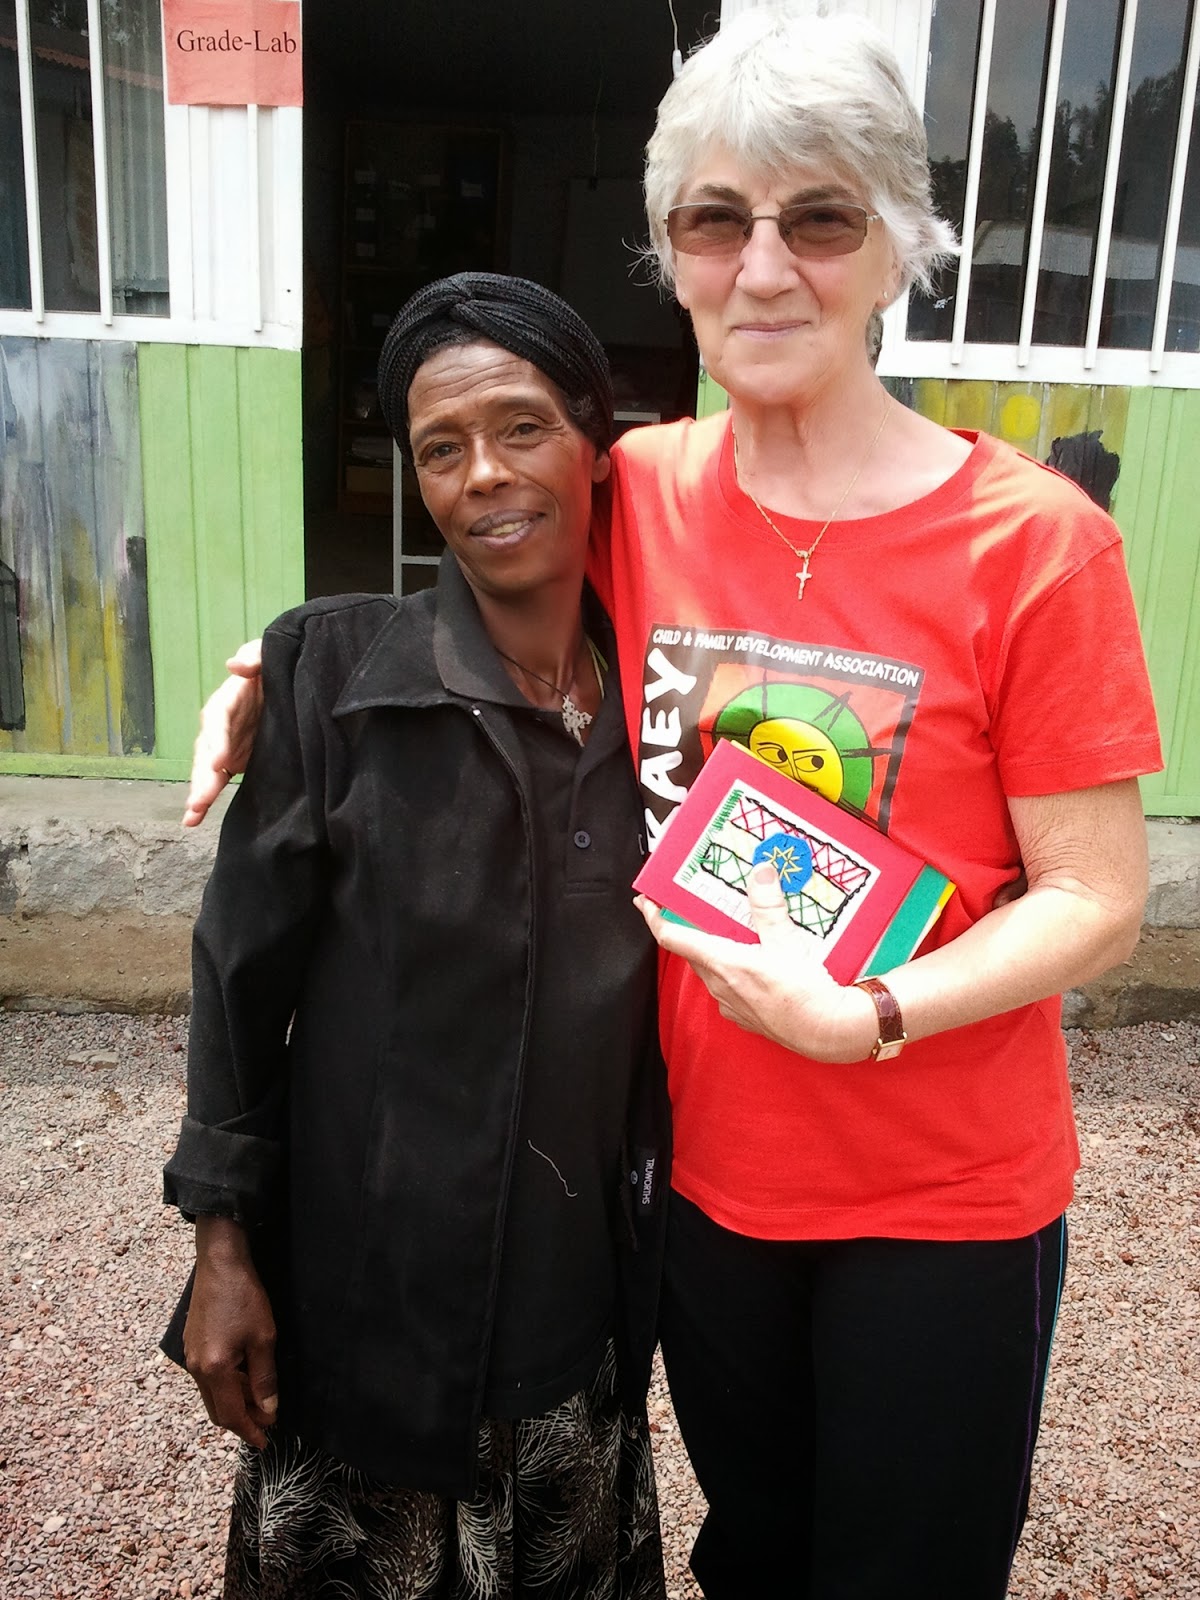
Craft Land TRADE FOR AID gives a RAEY of hope in Ethiopia

This post has been written by Kay Bruce, Marketing Manager and former Sewing Tutor for Craft Land. Kay describes her childhood as "growing up under a sewing machine"... with a mother who made soft toys and puppets as a business - a real 1980s mumpreneur!

Juggling a creative passion with a head for marketing and PR has not always been easy - for Kay, working for Craft Land is the best of both worlds!

Kay has also trained as a fashion designer and pattern cutter and designs unique, limited edition, printed silk scarves - see www.kaybruce.net

_____________________________________________________________________

Hello Lovely Reader!

Welcome to Craft Land's fab blog. Here's where we share the inner world of Craft Land with you - and show you how to make some cool stuff too!

For this post, I'd like to share with you something that touches my heart - Craft Land's support of the RAEY project in Ethiopia.

RAEY is a community school for children whose families are in extreme poverty and/or suffering due to illness.


Children at the RAEY School

Each year during Ramadan, Craft Land runs a "Trade for Aid" promotion; encouraging people to bring in their unwanted crafting tools, materials, books and machines - to donate to a charitable cause (in the spirit of Ramadan). Each year we work with a different charity.

In 2011 we worked with the Manzil School for Special Needs in Sharjah. A wonderful establishment that gives it's students confidence and experience - helping them to play a role in society and feel good about themselves. Our donations in 2011 enabled Manzil to teach machine sewing and yarn crafts to the students.

Manzil Students with the donated Sewing Machines in 2011

In 2012, Craft Land's Trade for Aid supported RAEY:

The RAEY community is still in it's infancy, with it's founder, Dr Carolyn Roesler, and her many geneous volunteers, gradually putting into place more and more elements to help those who are part of the community. One such element is a Sewing Room for the HIV Women's Centre. A place where ladies affected by the illness can learn a valuable skill and eventually produce products that can be sold to sustain the community and help them to be self-sufficient.

During Ramadan 2012 we received extremely generous donations - including two industrial sewing machines. It took some time to get the donations through Ethiopian customs (well done to the RAEY team for their dedication and persistence here!) and it might take a little time to get a venue with electricity for the machines, but once a venue has been found, the donated machines, tools and materials will be used by the teacher at the HIV Women's Centre to teach the ladies how to sew.


The ladies learn to sew by hand and on beautiful old pedal Singer machines (they don't make them like that anymore!)

Learning to Sew with Volunteer Janine de Klerk
 
We are looking forward to watching this element of the RAEY community grow and wish everyone involved all the best. For more information see www.raeyfoundation.org

And watch this space.... for Trade for Aid 2013 Craft Land took donations for Dubai-based charity Mawaheb - we will be delivering the donations shortly - I'll be posting pictures and words to share with you all in a few weeks.

Until then - May the CRAFT be with You!!! (perhaps more funny for the German-speaking readers... "Kraft" in german means "strength" or "force") :-)

K xx

Tuesday, September 17, 2013

Bunting Tutorial

This blog post is written by Reesha Almeida Coutinho, Craft Land sewing instructor and owner of Prêt à Papier, Custom Printables and Event Stationery.

Let me take this opportunity to briefly introduce myself to you. Ever since I can remember I have been interested in all kinds of artistic and creative activities, whether it be painting, sewing, crafting or interior design. I am very fortunate to be able to make my hobby my career. I hold a Bachelors Degree in Visual Communication from the Goa College of Art, and that has helped me gain a wider knowledge of the principles of design, colour, textures and form. These are principles I now use almost instinctively in any creative work I do.

I recently joined the Craft Land team of teachers as a sewing, quilting, machine embroidery teacher and designer. I have been obsessed with Craft Land ever since it first opened in Dubai. You can only imagine my excitement when I was offered a position as a teacher and designer here. Craft Land hosts a number of classes, workshops and clubs to help the residents of UAE develop their creative side. The store also offers a plethora of sewing and crafting supplies that inspire creative minds on a daily basis.

When I wanted to redecorate my daughters room which is also my craft room, I didnt have to look very far for inspiration.


I was instantly drawn to the new range of Lecien Fabric that we carry at Craft Land. These are lovely 100% pure Japanese cotton which seemed perfect for my vintage chic aqua & red themed vision. I chose some  florals combined with polka dots, which allowed the scheme to be girly and playful whilst not being too childish at the same time.

For my first blog post, I would like to share with you a tutorial to make a fabric bunting. It transformed the room and added that special whimsical touch.  I made 4 buntings with with 4 triangular shapes each and hung them over each large window in the room.


BUNTING TUTORIAL
To make 4 bunting strings with 4 different patterned triangles on each


YOU WILL NEED
1/4  metres of fabric from 4 different co-ordinating fabrics
5 metres of bias binding tape
4 metres of Rick rack tape
Scissors
Pins
A rotary cutter(optional)
A ruler
A tape measure
Sewing thread
The bunting template (Download here)


INSTRUCTIONS:
1.Download and print the bunting template according to instructions on the printable. Cut it out along the outside dotted line.

2. Fold one of your fabrics right sides together along the long sides. Place the template on top of the folded fabric.

Cutting the template

3. Using the template as a guide, cut out the triangles by placing the template opposite to each other every time, to use up the fabrics in the most economical way. Cut up all the triangles in this way. You should have 32 triangles.


4. Take two of the triangles from the same fabric and place them with the right rides facing each other. Sew down the two long sides of the triangles with a 1/4 inch seam. Leave the top open. Snip off the corner. Do this for all your triangles.

5.Turn all your triangles right side out. Iron them so that they are flat and snip off the excess fabric at the opening.

6.Cut out your bias binding strips into 4 pieces each 1.5m long.

7. Pin your first triangle 25cm away from one end of your bias strip. You should be able to fold your bias binding in half lengthwise so that you have a neat strip with no raw edges showing


8.The raw edge of the top of the triangle needs to be encased within the center fold of the bias binding tape.

9. Pin in place, repeat by attaching the rest of your triangles equally spaced along the length of your bias binding strip. You should leave about 25cm of bias binding free after attaching the 4th triangle.

Placing the triangles 
.

 10. Choose a thread that matches with your bias binding and top stitch down the entire length of the bias binding making sure the triangles are caught neatly within the stitches.


 11. All your triangles will now be attached to the length of the bias binding strip.

10. Measure and cut 4 pieces of rick rack tape into 1mm pieces.

11. Place the rick rack at the point where the first triangle starts. Fold the end in, and pin in place over the bias binding tape. Pin all along the length of the bias binding strip along the tops of the triangles.
The rick rack should end after the last triangle. Fold in the end. Machine stitch carefully to attach the rick rack to the bunting.

12. You now have 1 complete bunting, with 25cm free on each side of the triangle,s that you can use to hang your bunting. Repeat the above steps to make 3 more. Hang over your curtain rods and voila! Stand back and enjoy!


Monday, September 2, 2013

Embroidery at Craftland

Today I'd like to introduce myself to you all, I'm Jessica Aldred, the embroidery teacher and general embroidery guru at Craftland.

Canvaswork class sample
I trained to be a professional designer and embroiderer at the Royal School of Needlework (RSN) in the UK, and over three years I learnt 30 different hand embroidery techniques as well as restoration and conservation and art and design. After graduating I went to work in costume at the Royal Opera House in London where I bought and maintained the materials used to make the costumes. I worked on operas such as Madame Butterfly and Tosca and also for The Royal Ballet . After three years there I returned to the RSN where I spent four years working as the education coordinator. During that time I was hugely honoured to be a member of the team who produced the embroidery for the Duchess of Cambridge's wedding dress and veil. In 2011 my first book was published- Adventures in Needlework- which I co-authored with Emily Peacock who is well known in the UK for her bright, contemporary needlepoint kits.

Last year my husband and I moved to Dubai as a result of his job, but it was a timely move for me- I was ready for a fresh start. I soon discovered Craftland and was very impressed with their shop, classroom and team of experts, so I was thrilled when they offered me a job! Since I started I've been busy teaching, helping to select new stock for the shop, developing classes, designing and making samples and preparing for the embroidery clubs. In addition to the photograph above here are some of the new class samples I've created;

Goldwork class sample


Stumpwork class sample
Our classes start up again on 15th September and for embroidery there's now a clear path of progression from classes for complete beginners up to more complex and advanced techniques. If you're not sure where to start or what the different techniques are pop in to the shop, give us a call or email our class coordinator iman@mycraftland.com.

Our embroidery club resumes on 2nd October and for those of you who don't know about our clubs they're held once a month and bring together groups who like to share their enthusiasm for a particular form of craft. During the clubs there's a 'make and take'- we provide you with a kit for a small project which introduces you to a new technique or product. There's also guest speakers and a show and tell- we love to see what you're creating at home too!

And last but not least embroidery clinics are on Monday evenings from 7pm to 9:30pm and Tuesday mornings from 9:30am to 12noon. The clinics are for you to bring your own project and get expert help and advice, although if you just fancy hanging out and stitching with like minded people you're always welcome.

You can see our class descriptions, prices and full schedule here. If you'd like to know more about me and my work you can visit my website here. Thank you for reading, and I hope to see you at Craftland soon.

Sunday, July 7, 2013

Book Classes At Craft Land on TheCurve-ME.com


Fabulous new adult classes booking site - TheCurve-ME.com has launched in Dubai so you can now book your Craft Land class online!

Simply go onto www.TheCurve-ME.com and choose your Craft Land class - select, pay by credit card, sorted!

Life just gets better :-)

Saturday, June 15, 2013

Crafting Is Cool!

Need help keeping busy over the hot Dubai summer? We're presenting a fun & varied set of classes throughout July & August.


many of the summer projects on display in the window

During the regular season, our classes run weekly over several weeks, but during July and August our workshops will take place during one week - very convenient for those of us traveling for part of the summer!

As a special treat, Brother sewing machines will be sponsoring two of our classes, Sewing Zakka Style and Quilting Whirligig. Brother will be providing the fabulous new V7 machines for students to use, a Brother specialist will be on hand to help use the machines, and they will offer a fantastic discount on the machines at the end of the class so that when you fall in love with it you can take it home with you!


try machine embroidery with the Brother-sponsored Sewing Zakka Style class

discover the fantastic quilting features on the new Brother V7 with the Whirligig Quilt class
use this superb machine for free in the Brother-sponsored classes!

  We've got some fun classes for kids - Kids Can Sew intro and part 2 classes for machine sewists, and Kids Crafting for hand work. Kids ages 8 and above can learn to sew, knit, crochet and hand embroider.
Kids' Crafting - hand embroidered cloud pillow


Kids Can Sew! Part 2 - My Own Backpack

We're holding 2 sessions of our Beginners' Quilting class over the summer, as well as three different quilt project classes.
detail from the Floral Applique quilting class


Double Wedding Ring Mini quilting class
  Learn to hand embroider and improve your skills with our summer embroidery classes - an interesting variety of ribbon and classic embroidery styles.
learn Canvas Work hand embroidery in the Bunting Sampler class

take your hand embroidery 3-D with the Stumpwork class

hone your knitting skills in Knitting Part 2 - Baby Knits

knit these cute puppy slippers!
We also hold clinics during the summer months, where you can bring along your current project and a teacher is there to help.

You can see the full schedule on our website, click on "Schedule" for the calendar and "Descriptions" for all the juicy info on pricing, class content and timings.